
Creating a new project in the cloud is hard enough, but making sure that all your environments are well documented and that they are the same every time a new one is generated only makes it more challenging. All that on top of ongoing concerns such as stability and whether your infrastructure can scale. That’s where Infrastructure as Code comes in. In this article we’ll see some examples of using Bicep to declare a simple infrastructure for a cloud-native application in Azure.
Bicep enables you to deploy Azure resources. Bicep uses a declarative syntax that you treat like application code. Treating your infrastructure as code enables you to track changes to your infrastructure requirements and makes your deployments more consistent and repeatable.
Prerequisites
- Azure subscription
- Azure CLI
- Bicep CLI
- Visual Studio Code with the Bicep extension (optional)
In this article we’ll be using the Azure CLI to create resources and deploy our Bicep files. Of course, you can do the same operations directly from the Azure Portal if that’s your preference.
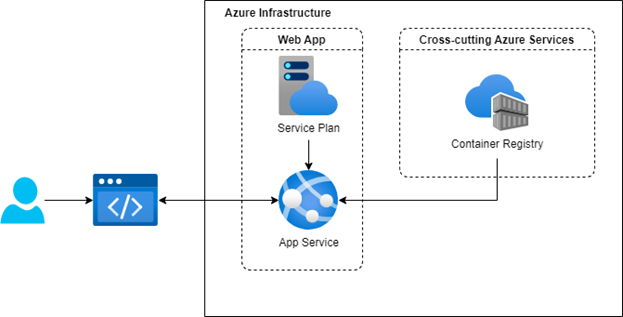
Diagram of what will be created
Let’s look at what we’ll be creating. We’ll limit the scope into a simple web application that will run on the App Service offering, that requires a Service Plan to configure the level of scaling. Also, we will be uploading a custom Docker image to the Container Registry so that our App Service container can pull our app and host it.
Create an Azure Resource Group
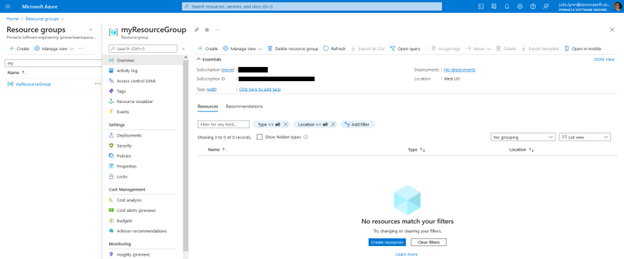
A neat way of having all our related resources in a single place is through a Resource Group. This will also help so that all our infrastructure under the same Subscription and on the same Region.
az group create --name myResourceGroup --location westusAfter running the command we’ll be able to validate that the resource group was created by logging into the Azure Portal.
Example Main Bicep file
Let’s continue by creating a file named ‘main.bicep’.
targetScope = 'resourceGroup'

param location string = resourceGroup().location

resource containerRegistry 'Microsoft.ContainerRegistry/registries@2021-09-01'= {
  name: 'pinnacleBicepRegistry'
  location: location
  sku: {
    name: 'Basic'
  }
  properties:{
    adminUserEnabled: true
  }
}
First, we’ll limit the scope to a Resource Group. This means that any resource declared in this Bicep file will be created as part of the same group, making it easier to manage services that have something in common such as environment or tenant as examples.
The next expression we see defines the ‘location’ as a parameter; this will help us use this value on other parts of the Bicep file exactly like we would treat a variable in any other programming language. The right side of the assignment makes use of a Bicep function; in this case it will get a reference to the Resource Group that is being referenced in the current scope and then we will get its location. When we created the group with the CLI command we sent westus, but in the next section we’ll get to see how this allows our Bicep file to be more flexible.
So far, we’ve only declared the Container Registry, we’ll later add the rest of the services we need for our application, but this will work nicely for our first deployment to the Resource Group we just created.
Deploy Bicep file to our Resource Group
Next, we’ll deploy this Bicep file to Azure. We’ll need to pass the Resource Group we created and the Bicep file as arguments. That will tell Azure Resource Manager that it needs to ensure that what is declared on the file needs to exist.
This is called Declarative programming, as opposed to the most common Imperative programming. We rely on Azure to know how to get things done instead of giving the specific instructions explicitly.
az deployment group create --resource-group myResourceGroup --template-file main.bicep -cThe -c flag means that we want the CLI to show us the resources that will be affected and asks us for confirmation.
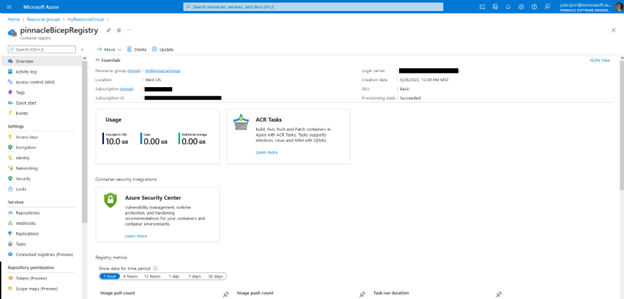
Same as last time, we’re able to go into the Azure Portal to confirm that the new resource was created as part of our new Resource Group.
Example Dockerfile
Now that we have a registry, let’s work on creating a Docker image that we can upload to it. For this example, we’ll be using the Alpine flavor of the official Nginx image as a base. Here’s what the Dockerfile looks like:
FROM nginx:alpine

WORKDIR /usr/share/nginx/html

RUN echo 'This container image was created at (UTC): ' >> ./index.html
RUN date +%x_%H:%M:%S:%N >> ./index.html
We’re appending the system’s date as a way of identifying when our custom image was created and to make sure that if we make changes, we’ll have an easy way of knowing if our website was updated.
To keep things simple, we only edit the default index.html file that comes with the base image, but feel free to replace it entirely with another custom html file.
Build and push the image into the Azure Container Registry
Once we have our Dockerfile we’ll need to build our image and upload it to our new Registry. A popular way of making Docker images available is through DockerHub and the Docker CLI, but since we provided our own Container Registry as part of our Azure Resource Group, we’ll use the Azure CLI’s ACR subcommand that wraps around the Docker CLI for the build process while at the same time pushes the new image to a registry of choice within Azure.
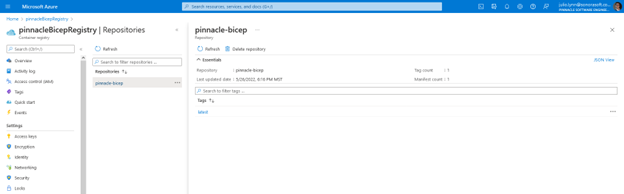
az acr build --image pinnacle-bicep:latest --registry pinnacleBicepRegistry --file Dockerfile .The arguments we’re sending are the Registry and the image name. The latter is made up of a combination of a new Repository name and a version tag. In this article we’ll be using the ‘latest’ tag for simplicity, although in practice any version tag can be used. All versions of the image will appear under the new Repository that will be created inside the Container Registry.
Add App Plan and App Service resources to Bicep file
We talked about how our Bicep file is declarative, in other words it means that it describes what the infrastructure should look like. This means that if we keep the Container Registry declaration that we had before and add more services like App Plan and App Service, the Resource Manager should detect that the Registry already exists and that it should only create the new resources.
targetScope = 'resourceGroup'

param location string = resourceGroup().location
param sku string = 'B1'
param repositoryName string = 'pinnacle-bicep'

resource containerRegistry 'Microsoft.ContainerRegistry/registries@2021-09-01'= {
  name: 'pinnacleBicepRegistry'
  location: location
  sku: {
    name: 'Basic'
  }
  properties:{
    adminUserEnabled: true
  }
}

resource appPlan 'Microsoft.Web/serverfarms@2021-03-01' = {
  name: 'myAppPlan'
  location: location
  kind: 'linux'
  sku: {
    name: sku
  }
  properties: {
    reserved: true
  }
}

resource appService 'Microsoft.Web/sites@2021-03-01' = {
  name: '${repositoryName}-app-service'
  location: location
  kind: 'app'
  identity: {
    type: 'SystemAssigned'
  }
  properties: {
    serverFarmId: appPlan.id
    siteConfig: {
      appSettings: [
        {
          name: 'DOCKER_REGISTRY_SERVER_URL'
          value: 'https://${containerRegistry.name}.azurecr.io'
        }
        {
          name: 'DOCKER_REGISTRY_SERVER_USERNAME'
          value: containerRegistry.name
        }
        {
          name: 'DOCKER_REGISTRY_SERVER_PASSWORD'
          value: containerRegistry.listCredentials().passwords[0].value
        }
      ]
      linuxFxVersion: 'DOCKER|${containerRegistry.name}.azurecr.io/${repositoryName}:latest'
    }
  }
}
There’s a lot to unpack here, so let’s start with the new Params that were added.
The newly declared App Plan makes use of the sku param to know what tier of container to use when creating the App Service instances when scaling up. It’s defaulted to ‘B1’ because it’s the smallest instance size available, but by defining it as a parameter we allow for that value to be overwritten when calling the az deployment command.
We previously used the Repository Name when pushing the image to the Registry. Declaring it as a parameter is done to simplify the deployment command since we’re only working with one repository.
Jumping to the App Service definition, a quick mention that the ‘name’ property will be used as the subdomain for the instance’s URL so it needs to be unique. Now getting into one of the most interesting aspects of Bicep. Notice how ‘serverFarmId’ is referencing ‘appPlan.id’ as if it was an object property; that’s because it is and it’s going to depend on the App Plan resource to be created to be able to retrieve its Id and use it as a reference, all without us having to run the deployment in parts or worry about where to look for it. Same approach is used for configuring the Docker image that will be used for creating the container instance, only that this time we use the ‘containerRegistry’ resource instead.
Re-deploy Bicep file
So now that we have our Bicep ready, we’ll use it for another Deployment. Only the resources that changed or that are new will be affected. The command that will be executed is exactly the same as last time, the only change is that the ‘main.bicep’ file was updated with the new resources.
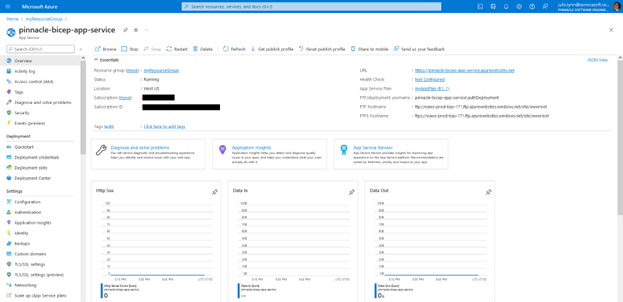
az deployment group create --resource-group myResourceGroup --template-file main.bicep -cThe command will run for a couple of minutes at the most, and once it’s ready we’ll be able to confirm that our new App Service was created through the Azure Portal. This will allow us to look at the status and other properties of the instance, including its URL.
Website up and running
After visiting the URL that appears on the App Service summary, we’re greeted by the Nginx welcome screen which includes the timestamp we added on the Dockerfile. All the traffic and statistics will be available on the Azure Portal.

Conclusion
Even with this short example we were able to learn about the advantages of Infrastructure as Code and use some powerful Bicep features. Visual Studio Code with the Bicep extension allows for autocomplete functionality that helps when working with new resources to configure the necessary properties, we can use params to customize how the resources are configured based on CLI arguments and rely on the resources object properties to reference services that are tied together even when they haven’t been created yet.
Other offerings for IaC
- Terraform – Open source IaC tool that uses a custom declarative configuration language.
- AWS Cloud Development Kit – Open source framework to provision cloud resources using TypeScript, Python, Java, and .NET.